 From the Desk of Gus Mueller
As we discussed last month, as audiologists we make decisions that impact a person’s life on a daily basis. But few decisions are as important as when we conduct ABR assessments for infants and toddlers, and make a determination if a hearing loss is present. That’s something we really need to get right. And getting it right means following appropriate protocols, and using the correct techniques and procedures.

Gus Mueller
In the October 20Q, guest author Dr. Jace Wolfe walked us through some of the test protocols that have been established, and reviewed the guidance that is contained in these documents. For example, based on our subjective analysis, how do we know when to label ABR waveforms as Clear Response, Response Absent, or Inconclusive? A lot of good information was covered, but our Question Man ran out of time, just as he was getting to some of the specific techniques and procedures. So we’re back this month to continue our discussion with Dr. Wolfe on this important topic.
Jace Wolfe, Ph.D., is the Director of Audiology at the Hearts for Hearing Foundation, and an adjunct Assistant Professor in the Audiology Department at the University of Oklahoma Health Sciences Center. Many of you are familiar with his popular book, Programming Cochlear Implants, now in its 2nd edition. He also has a popular column over at The Hearing Journal, known as “The Tot Ten.” As you know from last month, Jace has a lot of great information for us regarding the ABR testing of both infants and tots, and we’re pleased to have him back with us at 20Q for a second installment.
Gus Mueller, PhD
Contributing Editor
November 2014
To browse the complete collection of 20Q with Gus Mueller CEU articles, please visit www.audiologyonline.com/20Q
20Q: ABR Assessment in Infants - Getting It Right When it Matters the Most

Jace Wolfe
1. Thanks for coming back to continue our discussion on ABR testing for infants and young children. Where did we leave off when we finished last month?
II am glad we have the chance to talk further. Last time, we discussed contemporary protocols for ABR assessment in infants (Wolfe, 2014). As we ran out of time, we were talking about the interpretation of ABR waveforms and strategies we may employ to ensure accurate classification of ABR waveforms as Clear Responses, Response Absents, and Inconclusive. Does that ring a bell?
2. It certainly does! I believe I am comfortable classifying ABR waveforms using those categories. Does the English NHS ABR guideline mention anything else I should be doing to ensure the accuracy of my ABR interpretation?
Well, we’ve already discussed the most important parts, but there are a few more tips clinicians may use when uncertainty exists in the interpretation of waveforms near threshold. On occasion, a clinician may have obtained a pair of waveforms, but the criteria for a Clear Response and a Response Absent have not been met. In this case, it may be worthwhile to collect another pair of waveforms at the same level, so that the waveforms may be added together using weighted addition. Once completed, the clinician will have four waveforms to analyze.
3. I think I’m following you. Can you explain exactly what I need to do with these four waveforms?
The English Newborn Hearing Screening Programme (NHSP) ABR guideline (2013) indicates that waveforms 1 and 3 should be added together to create a summed waveform that possesses a larger number of collective sweeps than either of the individual waveforms alone. This practice alone will reduce the noise level, and if present, enhance the response. Waveforms 2 and 4 should also be added together to create another waveform. Then, the summed waveform created from the addition of waveforms 2 and 4 may be compared to the summed waveform from the addition of waveforms 1 and 3. The comparison of the summed waveforms should provide responses that are cleaner and that clarify the clinician’s task of waveform interpretation.
4. So that’s it on waveform analysis?
There’s one more thing I should mention. It is important to appropriately set the display parameters so that the recorded waveforms are not so excessively large as to make interpretation cumbersome. But at the same time, they should be large enough to allow the clinician to detect near-threshold responses. A good starting point is to set the display scale so that 1 msec on the x-axis is equal in length to .1 microvolt on the y-axis. However, when analyzing threshold-level responses, the clinician may want to adjust the scale so that 1 msec on the x-axis is equal to .03 microvolts on the Y-axis. This adjustment will allow you to identify a small response that may be present near threshold.
5. Good deal. I really think I feel comfortable with ABR analysis in young children. Is there anything I should know about ABR testing in babies?
Yes, there is quite a bit more. One important consideration is to make certain you place the recording electrodes in the right location. This can be tough with newborns, because their heads really don’t provide much real estate. Prior to electrode placement, I like to use an abrasive electrode gel and a Q-tip to prepare the electrode sites. I apply a very generous amount of electrode gel (about the size of a quarter) and make certain to scrub vigorously enough to obtain electrode impedances of 1 killiohm at all sites. An imbalance in electrode impedance across the different electrode sites will really increase the noise that is collected in the recording.
6. Where exactly do you recommend I place the electrodes?
I choose to use a 3-electrode montage with the non-inverting electrode located at high forehead and the inverting/common electrodes located at each mastoid. For adults and older children, the non-inverting electrode is often located at Cz (halfway between each ear and between the inion and nasion). However, infants have a soft spot (the fontanelle) at this location, so the area should be avoided. Knowing this, many clinicians make the mistake of placing the non-inverting electrode too low on the forehead, which will diminish the amplitude of the response. With that in mind, it is important for the clinician to place the non-inverting electrode as high on the forehead as possible.
The other two electrodes should be placed on the mastoids. This may be tricky, because usually there is not a lot of space there when testing infants. Also, it can be difficult to place to bone conduction oscillator without making contact with mastoid electrodes. I aim to place the mastoid electrodes slightly below the level of the external auditory meatus (no more than 1 cm below the meatus) making certain not to make contact with the auricle. When conducting bone conduction testing in infants, I usually place the oscillator on the squamous portion of the mastoid bone behind the ear right at the level of the upper part of the auricle. This location avoids the electrodes and electrode leads.
7. Simple enough, but I have heard that it is helpful to use a 4-electrode montage to allow for two-channel recording. Is that not correct?
There certainly are some advantages of a 4-electrode, 2-channel recording. For one, the clinician does not have to worry about making certain that the ipsilateral mastoid is connected to the inverting input and the contralateral electrode is connected to the common input, because the ipsilateral and contralateral responses are both recorded in a 2-channel recording. Also, the latency of the responses recorded from the ipsilateral and contralateral channels may be compared to ascertain which cochlea is producing the response during bone conduction assessment.
8. I understand the advantages. So why do you typically use a 3-electrode montage?
Good question. There are some limitations to comparing the latencies of waveforms in the ipsilateral and contralateral channels to determine the ear producing the response. Namely, it does not identify the correct side that is responding with 100% accuracy. As a result, masking the contralateral ear is the best approach to provide a definitive answer as to which cochlea is generating a bone conducted response. Because masking is required to be certain of which ear is responding, I choose to save time and enhance the infant’s comfort by using a 3-electrode montage. I believe this simplifies the process for all involved, and when the clinician uses masking appropriately and the electrodes are connected in the proper manner, then the integrity of the assessment is not compromised.
9. Makes sense. What’s next?
We spoke earlier about the importance of obtaining a low residual noise level in order to obtain high-quality recordings and allow for the recording of threshold-level responses. Let’s talk now about the management of competing noise sources. The biggest culprit of competing noise is most often the infant’s own myogenic (muscle) noise, and the best way to reduce this type of noise is to test the infant when he or she is sound asleep. For babies who are scheduled for natural-sleep ABR assessment, it is ideal to schedule the evaluation around the baby’s naptime if possible. During scheduling, we provide clear instructions to the family to try to keep the baby awake for at least two hours prior to the assessment. Since car rides for an infant are akin to an adult popping an Ambien after Thanksgiving dinner, it is also important to recommend that a second adult travel to the appointment to sit next to the baby’s car seat and attempt to keep him awake. It is also necessary to withhold feeding the baby until immediately prior to the commencement of testing.
There are two additional items of importance. The first is short and simple. The recording filter should be set with a high-pass cut-off of 30 Hz and a low-pass cut-off of 1500 Hz. It may be tempting to increase the cut-off of the high-pass to 100 Hz, as doing so will reduce the amount of myogenic noise that is collected. However, this will also attenuate the amplitude of the ABR response, so this change should be avoided. There is little to no ABR energy above 1500 Hz, so it is unnecessary to use a higher low-pass cut-off setting.
Another useful noise management parameter is the artifact rejection level. Many ABR systems possess default artifact reject settings of 15 microvolts or higher. In contrast, the English NHSP guideline recommends an artifact reject level setting between +/-3 to +/-10 microvolts. Keep in mind that ABR responses rarely exceed .5 microvolts. Once again, when a baby is restless, it may be tempting to increase the artifact reject level to allow for signal averaging to proceed. However, doing so will result in a waveform that is quite noisy with a poor signal-to-noise ratio making it difficult to record threshold level responses and almost impossible to achieve a residual noise level of 25 nanovolts. Again, in these cases, it is imperative to try to quiet the baby or eliminate other noise sources rather than adjust to acquisition parameters that will facilitate a poor recording.
10. Do you start your ABR testing as soon as they arrive at the clinic?
Actually, when possible, we first attempt to quickly complete acoustic immittance and otoacoustic emission assessment. These quick measures provide us with valuable information about the status of auditory function. After completing these tests, we apply the electrodes and ensure electrode impedance is satisfactory. Next, we ensure that the baby has a dry diaper. Then, we darken the room and we ask the parent to feed the baby. We believe that is ideal to test the child while he or she sleeps in a basinet, baby bean bag, or in a car seat as shown in Figure 1. This arrangement allows us to easily check electrodes on each side of the head and also to insert earphones into both ears. However, some babies will only sleep comfortably if they are in the arms of their mother.
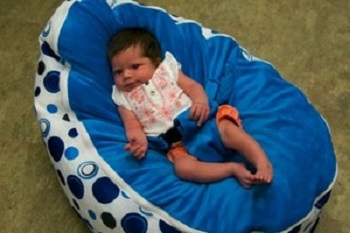
Figure 1. Example of a baby bean bag, optimal for infant ABR testing.
11. When is sedation used in ABR assessment?
ABR can often be completed under natural sleep for infants under 6 months old when the aforementioned steps are followed (i.e., sleep deprive the infant and withhold feeding until testing is ready to commence). Sedation or light anesthesia is typically required for older infants and young children. Chloral hydrate has long been considered the sedative of choice when conscious sedation is chosen to induce sleep in order for the ABR to be completed. However, at the current point in time, chloral hydrate is not manufactured for commercial use. As a result, it must be compounded in a pharmacy when prescribed for ABR assessment.
Lately, there does seem to be a movement away from the use of chloral hydrate for conscious sedation and toward light anesthesia, such as propofol, sevoflurane, and nitrous oxide. When ABR is completed under light anesthesia, the child’s vital signs are monitored by highly trained medical personnel throughout the procedure in an environment (e.g., medical setting) where emergent care may be provided expeditiously as necessary. Although complications associated with conscious sedation (e.g., choral hydrate) are rare, completion of the ABR under light anesthesia under the care of an anesthesiologist ensures that the child has quick access to medical care if a rare problem would arise, which enhances the safety of the child and limits the liability of the audiologist. Additionally, completion of the ABR under light anesthesia ensures that the child will be in the ideal state necessary for the recording of high-quality ABR waveforms.
There are, however, a couple of disadvantages associated with ABR testing under light anesthesia. First, it is costly, because it involves operating room facility fee costs as well as the cost of the anesthesia and anesthesiologist. Second, insurance does not always readily reimburse these services. Third, it may be difficult to schedule ABR cases at busy medical centers.
12. How about stimulus parameters? Is there anything that is important to keep in mind for ABR assessment with infants?
There are several important things to keep in mind. As you probably know, the American National Standards Institute (ANSI) has not published a standard describing calibration of evoked potential tone burst stimulus levels. As a result, it’s quite likely that you would find differences in the ABR tone burst stimulus levels used at randomly selected audiology clinics in the United States. In pediatric audiology, every decibel counts, so that kind of variability is just not tolerable. Fortunately, we have an easy fix.
13. I love easy fixes. Tell me more.
In lieu of an ANSI standard, clinicians in the United States may look to international standards that have been recently developed for the calibration of short duration ABR stimuli (IEC 60645-3, 2007; ISO 389-6, 2007; ISO 389-9, 2009). An upcoming ANSI standard will likely be similar to these international standards.
The Ontario and British Columbia Infant Hearing Program guidelines also provide RETpeSPL values for acoustic calibration at 0 dB nHL (BCEHP, 2008; OIHP, 2008). In case you’re not familiar with the term, RETpeSPL is for reference equivalent threshold peak equivalent sound pressure level and refers to peak amplitude of a click stimulus that corresponds to the typical behavioral threshold of an otologically normal young adult with normal hearing sensitivity. The peak equivalent SPL (peSPL) refers to the fact that the peak amplitude (as captured on an oscilloscope) of a short-duration stimulus (e.g., tone burst or click) is equal to the amplitude of a continuous tone (usually 1000 or 4000 Hz). RETpeSPL values are frequency- and transducer-specific and are based on the data from Stapells, Gravel, and Martin (1995) used to generate the correction factors described. When your ABR equipment is calibrated, these values should be used to make certain the levels you desire are achieved. To make it easier on the clinician, Ontario Infant Hearing Program provides exact instructions for setting the stimulus levels of certain ABR systems (e.g., Bio-Logic NavPro). For the purposes of calibrating your ABR equipment, the British Columbia Infant Hearing Programs provides calibration factors shown in Table 1.
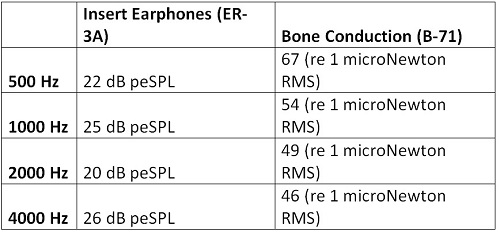
Table 1. Calibration factors (in dB peSPL) for calibration at 0 dB nHL, from the British Columbia Infant Hearing Programs.
14. That sounds reasonable. Is there anything else I should know about stimulus parameters?
Yes, a couple of additional items are worth mentioning. I like to use alternating polarity tone bursts, as research has shown that the ABR response is not affected by using alternating polarity, but the stimulus-related noise will be attenuated. Additionally, I like to use as fast of a stimulus rate is possible. For low-frequency tone bursts (e.g., 500 and 1000 Hz), a rate of 39.1 stimuli/second will allow for the acquisition of the response when using a 25 millisecond analysis window typical of infant ABR assessment. For high-frequency tone bursts (e.g., 2000 and 4000 Hz), I select a rate of 49.1 stimuli/second, which will expedite response collection without sacrificing the integrity of the recording.
15. Okay, I feel like I can get everything set up appropriately, but I sure would feel better if I had a game plan that would guide me through the testing I will need to complete.
I usually like to collect thresholds to tone bursts at 500, 2000, and 4000 Hz, and will also capture threshold at 1000 Hz if a large difference (i.e., > 20 dB) exists between 500 and 2000 Hz and time allows. Before I let you in on our game plan, let me briefly talk about ABR correction factors and stopping levels. First, a couple terms. You’re probably familiar with nHL, the “n” meaning normal; this is the level of the stimulus relative to normal behavioral threshold, with 0 dB nHL corresponding to the average behavioral hearing threshold level for a group of otologically normal young adults. A stimulus level of 50 dB nHL has an intensity that is 50 dB higher than the average threshold for otologically normal young adults.
A second term is eHL. The “e” is for estimated HL and refers to the behavioral audiometric threshold (in dB HL) that is estimated from the ABR threshold (in dB nHL). In short, frequency-specific correction factors are subtracted from the ABR dB nHL threshold to allow for an estimation of the behavioral audiometric threshold. Based on the excellent work of David Stapells and colleagues (Stapells, Gravel, & Martin, 1995), I use the following correction factors to estimate behavioral hearing thresholds (in dB eHL) from the tone burst ABR thresholds we obtain (in dB nHL):
- 500 Hz Tone Burst= 15 dB
- 1000 Hz Tone Burst = 10 dB
- 2000 Hz Tone Burst = 5 dB
- 4000 Hz Tone Burst = 0 dB
Again, use of these correction factors is quite straightforward as they are simply subtracted from the tone burst ABR threshold (dB nHL) to yield eHL. For example, if the ABR threshold to a 2000 Hz tone burst is 70 dB nHL, then the estimated behavioral threshold would be 65 dB eHL (70 dB nHL – 5 dB correction factor = 65 dB eHL).
16. Okay, we are still on the same page, but I have another question for you. What is the lowest level at which I would attempt to measure an ABR response?
It is our goal to identify all hearing losses greater than 25 dB HL. There are no data that provide a compelling case that amplification or other forms of intervention should be provided if an infant has hearing thresholds at 25 dB HL or better. Secondly, it occasionally can be difficult to even obtain a response in normal hearing infants at ABR presentation levels consistent with an eHL better than 25 dB HL.
To determine the lowest level at which we attempt to obtain an ABR response, I simply add our correction factors to 25 dB eHL, which provides the following stopping levels:
- 500 Hz Tone Burst= 40 dB nHL
- 1000 Hz Tone Burst = 35 dB nHL
- 2000 Hz Tone Burst = 30 dB nHL
- 4000 Hz Tone Burst = 25 dB nHL
17. Alright, that sounds great. So let’s go back to the “game plan” that you use to guide the sequence of your ABR testing?
Joanna Smith and I recently published an article on that topic (Smith & Wolfe, 2014), and I can review some of the main points for you. I typically begin the ABR with a 2000 Hz tone burst presented at the stimulus level consistent with our minimum testing level (i.e., 30 dB nHL at 2000 Hz) and obtain two responses that hopefully possess a high level of correlation. If a repeatable response is present, I then borrow a page from the English protocol and go up in level by 10 dB to obtain two more waveforms, again looking for a high level of repeatability (NHSP, 2013). The waveforms collected 10 dB above the minimum testing level should possess a wave V that is earlier in latency and greater in amplitude than the lower-level responses.
Collecting waveforms 10 dB above the minimum testing level accomplishes two important objectives. First, if the higher-level waveforms are indeed obtained at a greater amplitude and earlier latency, they provide validation of the waveforms obtained at the minimum testing level. Secondly, the clinician should be highly confident in the responses obtained at 10 dB above those obtained at the minimum testing level (assuming a clear response appeared to be present at the minimum testing level). As such, if there was any uncertainty of the validity of the response obtained at the minimum testing level, the attainment of an obvious response 10 dB higher in level will limit any possible error in interpretation to no greater than 10 dB.
A couple of things are worth mentioning at this point. For starters, clinicians who are inexperienced with ABR or who do not possess a high level of confidence in their ABR interpretation skills may find it helpful to begin the ABR with a 2000 Hz tone burst presented at 50 to 60 dB nHL for naturally sleeping babies (higher levels often awaken the baby) and 70 dB nHL for sedated children. This should result in a robust response with relatively robust waves III and V for the normal-hearing infant (Figure 2). This allows inexperienced clinicians to be highly confident in the ABR response they are observing, and the presence of a robust ABR waveform with multiple peaks indicates good neural synchrony within the auditory system. After attainment of a repeatable ABR at a moderate presentation level, the clinician should then proceed with the aforementioned test sequence. If the initial testing at 2000 Hz for 30 dB nHL doesn’t result in a repeatable response, then the presentation level is increased in 20-30 dB increments until a response is obtained or equipment limits are reached. Once a response is obtained, a 10 dB bracketing procedure is utilized.
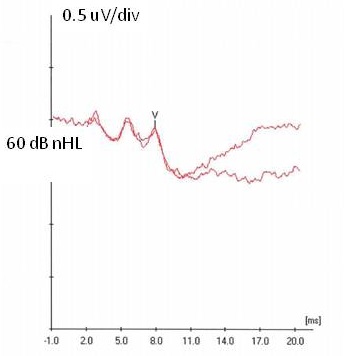
Figure 2. Robust response obtained at 60 dB nHL with waves III and V clearly identified.
18. Okay, I think I can follow this protocol easily enough. What’s next?
Once testing is completed at 2000 Hz for the first ear tested, we then switch to the opposite ear and repeat the same testing. If another normal response is obtained, then we test 500 Hz in each ear starting at 35 dB nHL. If an elevated response is obtained at any of the aforementioned frequencies, we immediately obtain a bone conduction threshold at the frequency at which the air conduction response is elevated; we then switch to the opposite ear and test the same frequency as well as obtain a bone conduction threshold if the opposite ear also possesses an elevated threshold. To clarify, if the response at 2000 Hz is elevated, we then complete bone conduction assessment at that frequency prior to switching test frequencies. This approach provides ear-specific results and also delineates whether the loss is conductive and in need of medical referral or sensorineural and also in need of amplification.
Finally, we assess 4000 Hz for each ear starting at 25 dB nHL. Again, if no clear response is obtained at the starting levels of any of the aforementioned frequencies, then we follow the ascending presentation procedure I mentioned earlier.
19. About how long does it take to do this testing?
It depends on a few things. As soon as we are able to confidently identify that a response is clearly present, we stop averaging and initiate a new waveform to obtain a repeatable response. If the response is not clearly present at the initial onset of testing, we average until we obtain a response or until we obtain a sufficiently low noise level without a present response. Now, I know this seems like it might take all day to complete this testing, but in reality, it may be done quite quickly. For a baby who rests peacefully and has normal auditory function, the aforementioned protocol may be completed (for both ears) within 20 minutes. For babies with hearing loss, testing typically takes no more than one hour. Of course, that assumes that the baby sleeps peacefully throughout the testing. Longer test time is required if the infant is restless throughout the assessment.
Now, you may have noticed that we haven’t spoken much about the use of a click stimulus for ABR testing in infants. Several years ago, we sacrificed an old audiology sacred cow and abandoned the routine use of the click in infant ABR assessment. The tone burst ABR described above provides a frequency-specific assessment of auditory function with the means to define type of hearing loss as well. Additionally, well-formed tone burst ABR waveforms indicate good neural synchrony and integrity, especially when obtained at levels consistent with normal hearing (Stapells, 2011).
If ABR tone burst responses are only present at levels consistent with a severe to profound hearing loss, then the clinician should consider measuring a click-evoked ABR to rule out auditory neuropathy spectrum disorder (ANSD). We don’t have enough time to discuss the details of click-evoked ABR testing today, but I would refer you to English NHSP and Canadian protocols that aptly address this topic:
- English Newborn Hearing Screening Programme Guidelines for Cochlear Microphonic Testing. Available at https://hearing.screening.nhs.uk/getdata.php?id=22776
- British Columbia Early Hearing Program’s Diagnostic Audiology Protocol. Available at https://www.courses.audiospeech.ubc.ca/haplab
- Ontario Infant Hearing Program Audiologic Assessment Protocol. Available at https://www.mountsinai.on.ca/care/infant-hearing-program/documents/IHPAudiologicAssessmentProtocol3.1FinalJan2008.pdf
20. Okay, I think I am ready! Do you have any last words of advice before I head to the sound booth?
Sure! Make certain to stick with the core principles of diagnostic audiology. Any good clinician adheres to the cross-check principle. ABR results should be cross-checked with 1000 Hz probe tone tympanometry, acoustic reflex testing, and otoacoustic emission assessment to obtain a thorough picture of auditory function. Also, never rest on your laurels. Objective assessment of auditory function is constantly evolving. Exciting work is being conducted to explore the potential of improving the assessment of auditory function in infants through the use of new stimuli such as chirps, new recording techniques such as wireless data collection and Bayesian filtering, and other measures such as the auditory steady state response. Clinicians must stay abreast of these technological advances and apply new measures when aptly supported by research. Additionally, take the time to review the aforementioned professional guidelines. Pediatric audiologists should be well-versed with these excellent documents. Finally, I hope our discussion will help you with your next infant ABR assessment. Good luck!
References
British Columbia Early Hearing Program (BCEHP) (2008). Diagnostic audiology protocol [pdf document]. Retrieved from https://www.phsa.ca
International Electrotechnical Commission (IEC). (2007). IEC 60645-3, Ed 2.0. Electroacoustics – Audiometric equipment – Part 3: test signals of short duration. Available from https://www.iec.ch
International Organization for Standardization (ISO). (2007). ISO 389-6. Acoustics – Reference zero for the calibration of audiometric equipment – Part 6: Reference threshold of hearing for test signals of short duration. Available from https://www.iso.org
International Organization for Standardization (ISO). (2009). ISO 389-9. Acoustics - Reference zero for the calibration of audiometric equipment – Part 9: Preferred test conditions for the determination of reference hearing threshold levels. Available from https://www.iso.org
Newborn Hearing Screening Programme (NHSP) (2013). Guidance for auditory brainstem response testing in babies, Version 2.1 [pdf document]. Retrieved from https://hearing.screening.nhs.uk
Ontario Infant Hearing Program. (2008). Ontario Infant Hearing Program, Audiologic assessment protocol [pdf document]. Retrieved from https://www.mountsinai.on.ca/care/infant-hearing-program/documents/IHPAudiologicAssessmentProtocol3.1FinalJan2008.pdf
Smith, J.T., & Wolfe, J. (2014). Using contemporary ABR protocols to get accurate results. The Hearing Journal, 67(5), 36, 38-40.
Stapells, D.R. (2011). Frequency-specific threshold assessment in young infants using the transient ABR and the brainstem ASSR. In Seewald R & Tharpe AM (eds.), Comprehensive Handbook of Pediatric Audiology (pp. 409-448). San Diego, CA: Plural Publishing Inc.
Stapells, D.R., Gravel, J.A., & Martin, B.A. (1995). Thresholds for auditory brainstem responses to tone in notched noise from infants and young children with normal hearing or sensorineural hearing loss. Ear and Hearing, 16, 361-371.
Wolfe, J. (2014). 20Q: ABR assessment in infants - protocols and standards. AudiologyOnline, Article 12999. Retrieved from www.audiologyonline.com
Cite this Content as:
Wolfe, J. (2014, November). 20Q: ABR assessment in infants - getting it right when it matters the most. AudiologyOnline, Article 13079. Retrieved from https://www.audiologyonline.com.

