Interview with Randy Morgan Westone
Share:
Topic: Making a PERFECT (ear mold) IMPRESSION
Beck: Hi Randy, thanks for your time this morning.
Morgan: Hi Doug. Thank you for the opportunity to provide this information.
Beck: I'd like to focus our discussion today on how to take perfect ear mold impressions. I think a basic step-by-step review would probably be welcomed by most of us!
Morgan: I agree Doug. Most of us, most of the time, do a very good job with impressions, but there are a few steps worthy of reconsideration, and now and then some new products come out which makes the whole process, and the end-product better.
Beck: Agreed. Let's start with patient rapport and we'll go all the way through to shipping.
Morgan: Great. Patient rapport is really important. If the patient is nervous or jumpy, it'll be more difficult for us, and for them. So, the first thing is the basic explanation of what we're going to do, and why.
Beck: So it's probably best not to approach them with a giant plastic syringe and a blunt tip while talking on your cell phone!
Morgan: I see you've been through this before! Yes, it is always best to slow down, visit with them a little, make sure they know what you're going to do and why. Remember, to professionals, taking an impression is a regular every day occurrence. But to the patient, it's a new or a rare event, and it needs to be approached with ease and comfort. I show them the tools, and sometimes with little kids, we even squirt a bit of impression material in their hands so they can see it's soft and non-threatening.
Beck: OK, very good. And does this usually happen before or after you've inspected the ear and the canal?
Morgan: Usually rapport is established before anything else. After that's been addressed, then I like to review the ear canal, preferably with a video-otoscope to reacquaint myself with the particular ear canal, the anatomy, the location of the second bend and any other physical attributes or anomalies I need to be aware of.
Beck: And using the video-otoscope offers yet another opportunity to establish rapport, right?
Morgan: Yes, it really does. Most people never get to see their ear canals and eardrums, and the video-otoscope is a welcome technology for most people. Kids love it too, as they can see what their ear really looks like, and adults like it because they get to see that there is or isn't wax present, and they appreciate the chance to see what you're doing.
Beck: I agree, it's a wonderful tool and it does matter. So after the ear canal has been inspected, what's the next step?
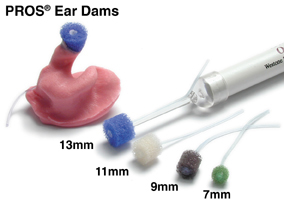
Morgan: I like to use the PROS® ear dam. PROS are the foam dams that have a ventilation tube running through the center. It's a huge improvement over the old foam dam; rather than having a thread or a string to hold the dam itself, it uses a narrow silicone tube that allows air to get to either side of the dam so air pressure equalizes. There's no "suction" when the impression comes out of the ear, no positive pressure when the material goes into the ear canal, and that makes it more pleasant for the patient.
Beck: So again, the focus is on patient comfort, keeping them happy and not surprising them, and having no additional air pressure as you move in or out of the ear.
Morgan: Exactly, if you keep them happy and comfortable, it's easier all around.
Beck: Personally, I like using cotton ear dams as I am able to place a little Oto-Ease® on the dam, and then form it, and place it where I want it.
Morgan: Sure. Lots of people still use cotton, and that's fine. But I'll bet you'd be surprised how much faster and easier it is with the right diameter PROS. If you've got it placed correctly, it really is fast and easy, and as you said, comfort is a key factor. I think that if you try it a few times, you'll never go back to cotton. And your patients will like not being "pressured". You can use Oto-Ease with the PROS dams too, just place a little along the circumference of the PROS prior to inserting it into the ear canal. By the way, the PROS come in multiple sizes for various anatomic presentations.
Beck: Very good. And, can we spend a moment on the issue of how to manipulate the ear dam into the right position within the ear canal?
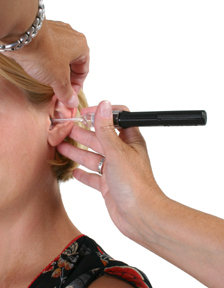
Morgan: Yes, thanks for mentioning that. I think it is so important to use a lighted ear probe to correctly and safely position the dam. In fact, it's hard to describe in words, but easy to show in a photo (see below) that I brace my hand along the patient's face whenever I am working in the ear canal, whether to clean wax or to place an ear dam. That way, if the patient moves, jerks their head, coughs, or whatever, I move with them, so I cannot puncture the eardrum or scratch the ear canal skin.
Beck: I totally agree. I used to tell my students that if your hand is not braced while you're working in an ear, you're dangerous, and I still believe that's true.
Morgan: Absolutely. Prior to injecting material into the ear, it helps to straighten the ear canal a little bit, not so much as to misshapen it, but enough to allow easier placement of the dam. I like to take a second look with the video-otoscope to be sure the dam is placed correctly.
To properly fill the ear with impression material, I like to again straighten the ear canal a bit by gently pulling out and back on the pinna. This helps you place the tip of the syringe (or the mixing tip) into the canal to begin the process. Inject material into the canal slowly, while holding the tip in one position. As the canal fills, the material will begin to flow back around the tip of the syringe. This is good. Release the pinna and continue to fill the ear. Slowly move the tip around the bowl of the ear, beginning near the bottom and moving up the rear of the concha, into the anti-helix area, and finally back to the center of the bowl.
Move slowly, making sure the tip remains slightly embedded in the flowing material. This will prevent voids, creases, and gaps from forming in the impression.
Beck: What about "Bite Blocks?"
Morgan: Personally, I have always had great results with people in their natural states: smiling, talking, laughing, turning their heads, stretching their necks, etc. However, much research has been done on impression technique and the moving ear canal, this research has been the catalyst for many Hearing Healthcare professionals to use bite blocks with great success during the impression process.
Beck: Very good. So then, how do we know when it's time to remove the material?
Morgan: I take my fingernail and try to gently score the material. If the material shows the fingernail scratch, it isn't ready. A properly cured impression will not accept a fingernail scratch. Usually it's between 3 and 5 minutes, maybe 6 minutes.
Beck: And your preferred removal protocol?
Morgan: I start by pulling the pinna gently all the way around the impression to loosen it up, and then release the helix area. With a forward rotation toward the top of the head, slowly remove the impression from the ear.
Beck: And then re-inspection of the ear canal and the impression?
Morgan: Correct. Again, it's a good idea to use the video-otoscope to review the ear canal and the eardrum, and then inspect the impression to make sure it's deep enough, usually meaning past the second bend, and that it has no air bubbles or cracks in it, and the outer surface of the impression should be a series of concentric circles.
Beck: And assuming we've been using silicone materials, how do you secure it to the box for shipping?
Morgan: Well, there really is no reason to secure it within the box...it's fine bouncing around in there and it won't get damaged, as long as you used silicone impression material. Don't forget to include a fully completed order form in the box.
Beck: Thanks Randy. It's been a pleasure speaking with you, and thanks so much for your time and the refresher course.
Morgan: My pleasure Doug. Thank for thinking of Westone!
- - - - - - -
For more information on Westone, CLICK HERE.
Morgan: Hi Doug. Thank you for the opportunity to provide this information.
Beck: I'd like to focus our discussion today on how to take perfect ear mold impressions. I think a basic step-by-step review would probably be welcomed by most of us!
Morgan: I agree Doug. Most of us, most of the time, do a very good job with impressions, but there are a few steps worthy of reconsideration, and now and then some new products come out which makes the whole process, and the end-product better.
Beck: Agreed. Let's start with patient rapport and we'll go all the way through to shipping.
Morgan: Great. Patient rapport is really important. If the patient is nervous or jumpy, it'll be more difficult for us, and for them. So, the first thing is the basic explanation of what we're going to do, and why.
Beck: So it's probably best not to approach them with a giant plastic syringe and a blunt tip while talking on your cell phone!
Morgan: I see you've been through this before! Yes, it is always best to slow down, visit with them a little, make sure they know what you're going to do and why. Remember, to professionals, taking an impression is a regular every day occurrence. But to the patient, it's a new or a rare event, and it needs to be approached with ease and comfort. I show them the tools, and sometimes with little kids, we even squirt a bit of impression material in their hands so they can see it's soft and non-threatening.
Beck: OK, very good. And does this usually happen before or after you've inspected the ear and the canal?
Morgan: Usually rapport is established before anything else. After that's been addressed, then I like to review the ear canal, preferably with a video-otoscope to reacquaint myself with the particular ear canal, the anatomy, the location of the second bend and any other physical attributes or anomalies I need to be aware of.
Beck: And using the video-otoscope offers yet another opportunity to establish rapport, right?
Morgan: Yes, it really does. Most people never get to see their ear canals and eardrums, and the video-otoscope is a welcome technology for most people. Kids love it too, as they can see what their ear really looks like, and adults like it because they get to see that there is or isn't wax present, and they appreciate the chance to see what you're doing.
Beck: I agree, it's a wonderful tool and it does matter. So after the ear canal has been inspected, what's the next step?
Morgan: I like to use the PROS® ear dam. PROS are the foam dams that have a ventilation tube running through the center. It's a huge improvement over the old foam dam; rather than having a thread or a string to hold the dam itself, it uses a narrow silicone tube that allows air to get to either side of the dam so air pressure equalizes. There's no "suction" when the impression comes out of the ear, no positive pressure when the material goes into the ear canal, and that makes it more pleasant for the patient.
Beck: So again, the focus is on patient comfort, keeping them happy and not surprising them, and having no additional air pressure as you move in or out of the ear.
Morgan: Exactly, if you keep them happy and comfortable, it's easier all around.
Beck: Personally, I like using cotton ear dams as I am able to place a little Oto-Ease® on the dam, and then form it, and place it where I want it.
Morgan: Sure. Lots of people still use cotton, and that's fine. But I'll bet you'd be surprised how much faster and easier it is with the right diameter PROS. If you've got it placed correctly, it really is fast and easy, and as you said, comfort is a key factor. I think that if you try it a few times, you'll never go back to cotton. And your patients will like not being "pressured". You can use Oto-Ease with the PROS dams too, just place a little along the circumference of the PROS prior to inserting it into the ear canal. By the way, the PROS come in multiple sizes for various anatomic presentations.
Beck: Very good. And, can we spend a moment on the issue of how to manipulate the ear dam into the right position within the ear canal?
Morgan: Yes, thanks for mentioning that. I think it is so important to use a lighted ear probe to correctly and safely position the dam. In fact, it's hard to describe in words, but easy to show in a photo (see below) that I brace my hand along the patient's face whenever I am working in the ear canal, whether to clean wax or to place an ear dam. That way, if the patient moves, jerks their head, coughs, or whatever, I move with them, so I cannot puncture the eardrum or scratch the ear canal skin.
Beck: I totally agree. I used to tell my students that if your hand is not braced while you're working in an ear, you're dangerous, and I still believe that's true.
Morgan: Absolutely. Prior to injecting material into the ear, it helps to straighten the ear canal a little bit, not so much as to misshapen it, but enough to allow easier placement of the dam. I like to take a second look with the video-otoscope to be sure the dam is placed correctly.
To properly fill the ear with impression material, I like to again straighten the ear canal a bit by gently pulling out and back on the pinna. This helps you place the tip of the syringe (or the mixing tip) into the canal to begin the process. Inject material into the canal slowly, while holding the tip in one position. As the canal fills, the material will begin to flow back around the tip of the syringe. This is good. Release the pinna and continue to fill the ear. Slowly move the tip around the bowl of the ear, beginning near the bottom and moving up the rear of the concha, into the anti-helix area, and finally back to the center of the bowl.
Move slowly, making sure the tip remains slightly embedded in the flowing material. This will prevent voids, creases, and gaps from forming in the impression.
Beck: What about "Bite Blocks?"
Morgan: Personally, I have always had great results with people in their natural states: smiling, talking, laughing, turning their heads, stretching their necks, etc. However, much research has been done on impression technique and the moving ear canal, this research has been the catalyst for many Hearing Healthcare professionals to use bite blocks with great success during the impression process.
Beck: Very good. So then, how do we know when it's time to remove the material?
Morgan: I take my fingernail and try to gently score the material. If the material shows the fingernail scratch, it isn't ready. A properly cured impression will not accept a fingernail scratch. Usually it's between 3 and 5 minutes, maybe 6 minutes.
Beck: And your preferred removal protocol?
Morgan: I start by pulling the pinna gently all the way around the impression to loosen it up, and then release the helix area. With a forward rotation toward the top of the head, slowly remove the impression from the ear.
Beck: And then re-inspection of the ear canal and the impression?
Morgan: Correct. Again, it's a good idea to use the video-otoscope to review the ear canal and the eardrum, and then inspect the impression to make sure it's deep enough, usually meaning past the second bend, and that it has no air bubbles or cracks in it, and the outer surface of the impression should be a series of concentric circles.
Beck: And assuming we've been using silicone materials, how do you secure it to the box for shipping?
Morgan: Well, there really is no reason to secure it within the box...it's fine bouncing around in there and it won't get damaged, as long as you used silicone impression material. Don't forget to include a fully completed order form in the box.
Beck: Thanks Randy. It's been a pleasure speaking with you, and thanks so much for your time and the refresher course.
Morgan: My pleasure Doug. Thank for thinking of Westone!
- - - - - - -
For more information on Westone, CLICK HERE.
